1. Introduction
The Next.js app we'll be exploring is designed to sync emails from a Gmail account to Notion databases. It provides a seamless way to capture email data and store it in a structured format within Notion. The app leverages the power of Next.js, a popular React framework, to build a fast and efficient web application.
2. Prerequisites
Before diving into the app's features and functions, ensure that you have the following prerequisites:
- Node.js installed on your machine
- Basic knowledge of Next.js and React
- Familiarity with JavaScript and TypeScript
- A Gmail account with the "log" label configured
- A Notion account with the necessary permissions
3. Setting Up the Next.js App
To get started, create a new Next.js app using the following command:
npx create-next-app@latest next-notion-email-sync
Choose the appropriate options for your project, such as the programming language (JavaScript or TypeScript) and the styling framework (e.g., Tailwind CSS).
Navigate to the project directory:
cd next-notion-email-sync
Install the required dependencies:
npm install @notionhq/client nookies
4. Configuring Environment Variables
Create a .env.local file in the root directory of your project and add the following environment variables:
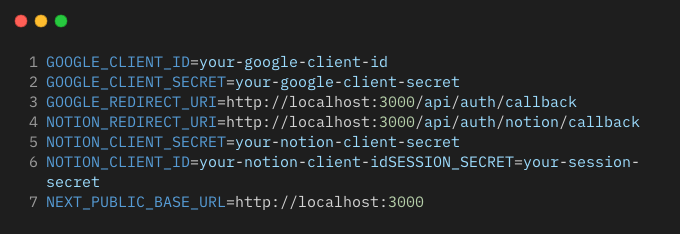
Replace the placeholders with your actual values obtained from the Google and Notion developer consoles.
5. Implementing Gmail Authentication
Create a new file pages/api/auth/login.js and add the following code:

This API route handles the Gmail authentication process by redirecting the user to the Google authentication URL.
Create a new file lib/googleAPI.js and implement the getGoogleAuthURL function:

This function generates the Google authentication URL with the necessary scopes and configuration.
Create a new file pages/api/auth/callback.js to handle the callback from the Google authentication flow:

This API route handles the callback from the Google authentication flow, retrieves the access token, and stores it in the session.
Implement the getTokens function in lib/googleAPI.js:
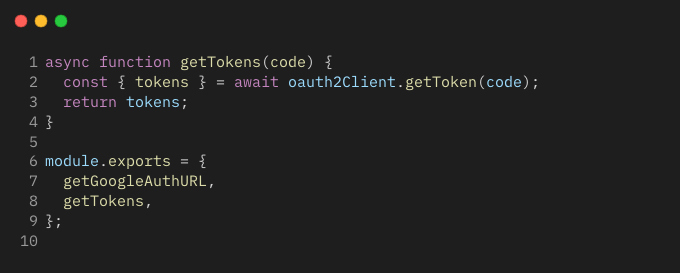
This function exchanges the authorization code for access tokens.
6. Syncing Emails from Gmail
Create a new file pages/api/sync.js to handle the email syncing process:

This API route handles the email syncing process. It retrieves the access token and user email from the session, fetches the emails using the fetchEmails function from lib/googleAPI.js, and returns a success or error response.
Implement the fetchEmails function in lib/googleAPI.js:

This function fetches emails from the user's Gmail account using the Gmail API. It retrieves the messages with the "log" label, extracts the relevant email data, and updates the synced email count using the /api/update-synced-email-count API route.
7. Implementing Notion Authentication
Create a new file lib/notionAPI.js and add the following code:

This file contains functions for handling Notion authentication. The getNotionAuthURL function returns the Notion authorization URL, and the exchangeCodeForToken function exchanges the authorization code for an access token and retrieves the user's databases.
Create a new file pages/api/auth/notion/callback.js to handle the callback from the Notion authentication flow:

This API route handles the callback from the Notion authentication flow. It exchanges the authorization code for an access token, retrieves the user's databases, and stores them in cookies.
8. Selecting Notion Databases
Create a new file components/database-setup.tsx to handle the database selection process:

This component handles the database selection process. It allows the user to select the Contacts and Interactions databases from the available options and maps the email fields to the corresponding database fields.
Create a new file pages/database-setup.js to render the DatabaseSetup component:

This page component renders the DatabaseSetup component and passes the necessary props. It retrieves the databases from the notionDatabases cookie and handles the form submission by storing the selected database IDs and field mappings in cookies.
9. Mapping Email Fields to Notion Database Properties
In the DatabaseSetup component, the contactsFieldMappings and interactionsFieldMappings state variables handle the mapping of email fields to the corresponding database fields.
The contactsFieldMappings array contains objects with the following structure:

emailFieldrepresents the field from the email object (e.g., "sender", "senderEmail").databaseFieldrepresents the corresponding field in the Contacts database.
Similarly, the interactionsFieldMappings array contains objects with the same structure, mapping email fields to the corresponding fields in the Interactions database.
The dropdown menus in the DatabaseSetup component allow the user to select the appropriate database fields for each email field. The selected mappings are stored in the respective state variables.
10. Syncing Emails to Notion Databases
Create a new file lib/notionAPI.js and add the following functions:

The addEmailToDatabase function adds an email to a Notion database. It takes the email properties, access token, and database ID as parameters and creates a new page in the specified database using the Notion API.
The getSyncedEmailIds function retrieves the synced email IDs from a Notion database. It uses the access token and the sync database ID stored in localStorage to query the database and extract the email IDs.
Update the handleSync function in the DatabaseSetup component to sync the emails to the selected Notion databases:
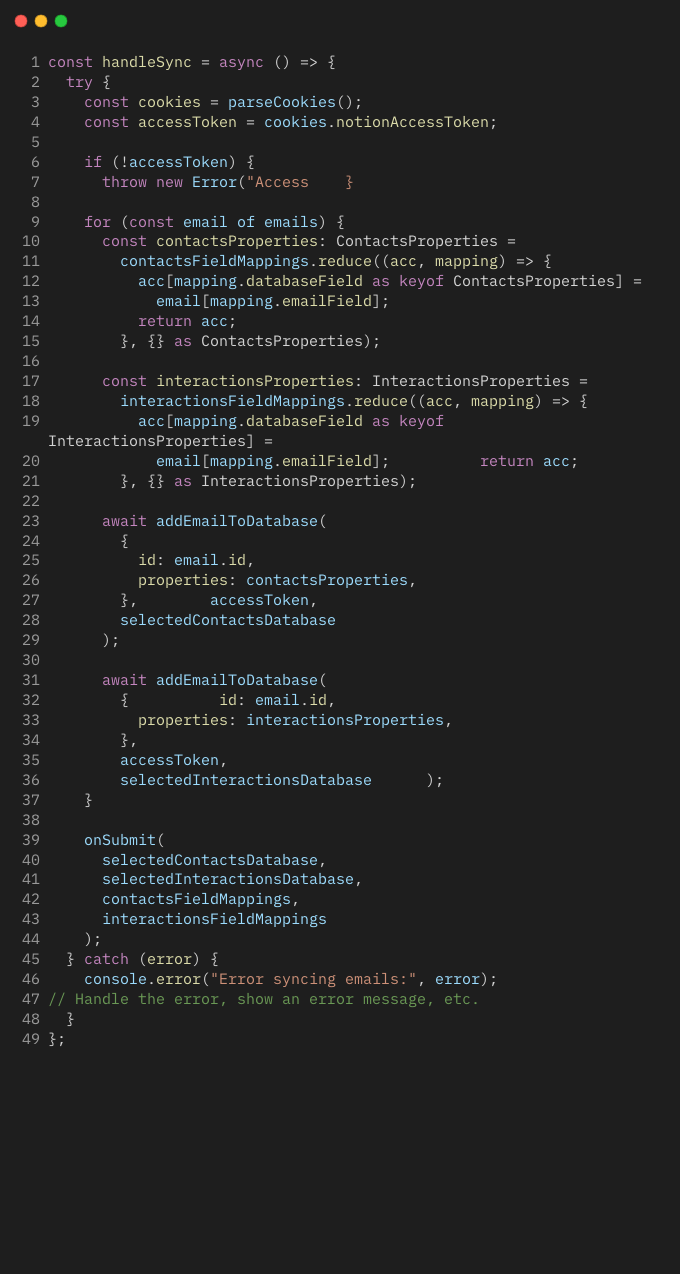
This updated handleSync function retrieves the access token from cookies, iterates over the emails, maps the email fields to the corresponding database properties based on the field mappings, and calls the addEmailToDatabase function to sync each email to the selected Contacts and Interactions databases.
11. Handling Errors and Edge Cases
Throughout the app, error handling is implemented to catch and handle potential errors gracefully. Here are a few examples:
- In the API routes, try-catch blocks are used to catch errors and return appropriate error responses.
- In the
fetchEmailsfunction, errors are caught and logged, and an error is thrown to propagate the error to the calling code. - In the
addEmailToDatabaseandgetSyncedEmailIdsfunctions, errors are caught, logged, and thrown to handle them appropriately.
It's important to handle edge cases and provide meaningful error messages to the user when something goes wrong. You can display error messages using UI components or alert the user with appropriate notifications.
12. Styling and UI Components
The app uses Tailwind CSS for styling and includes various Shadcn UI components to enhance the user experience. Here are a few notable components:
Button: A reusable button component with different variants and sizes.DropdownMenu: A dropdown menu component used for selecting databases and mapping fields.Table: A table component used for displaying the field mappings.
These components are styled using Tailwind CSS classes to achieve a consistent and visually appealing design.
13. Deploying the App
To deploy the Next.js app, you can use platforms like Vercel or Netlify. These platforms provide seamless integration with Next.js and offer easy deployment workflows.
Make sure to set the necessary environment variables in your deployment platform's settings to match your production environment.
14. Conclusion
In this tutorial, we explored the features and functions of a Next.js app that syncs emails from a Gmail account to Notion databases. We covered the following key aspects:
- Setting up the Next.js app and configuring environment variables
- Implementing Gmail authentication and syncing emails
- Implementing Notion authentication and selecting databases
- Mapping email fields to Notion database properties
- Syncing emails to Notion databases
- Handling errors and edge cases
- Styling and UI components
- Deploying the app
By following this guide, you should have a solid understanding of how the app works and be able to replicate or build upon it for your own purposes.
Remember to handle sensitive information securely, such as access tokens and client secrets, and ensure that your app follows best practices for security and performance.